
This sailing dinghy launching trolley is made out of wood and epoxy and is able to be constructed using simple tools. Most people do not have the skills or tools to weld a metal launching trolley, but this trolley is a simple, sturdy and functional alternative. The trolley design can be readily adapted to suit both sailing dinghies and small motor boats such as tinnies and inflatable boats.

Nearly completed Sabre launching trolley — the padding is yet to be glued on the bunks.
When we purchased a Minnow sailing dinghy for my daughters to learn to sail in, it did not come with a launching trolley. I was therefore forced to build a trolley. I scoured the internet and found many designs, most of which suffered from poor design and construction and did not suit my needs. I therefore developed my own design constructed out of wood.
My Minnow trolley was very simple, but effective. With a pram bow and a relatively flat hull, I did not bother building bunks for the trolley. I simply covered the frame with foam pool noodles and sat the dinghy straight on top.
We subsequently purchased two Sabre sailing dinghies, both of which had woeful launching trollies, but for different reasons. One trolley was stupidly heavy and had small wheels (including one at the front) — perfect for launching off a concrete boat ramp, but terrible for trying to launch and retrieve the boat off a sandy beach. The other trolley was too short, had poorly formed bunks and wobbly wheels. The boat would regularly fall backwards off the trolley, the hull was not cradled well on the bunks, and the wheels were constantly on the verge of falling off.
Using the knowledge gained from building the Minnow trolley, I have refined the design and built two new trolleys for the Sabres as described below. I have noted in the text below where I think the design can be further improved. I have also written some notes in a separate post on how I think the design can be improved further here.
Design considerations
When planning to build a boat launching trolley, there are two primary considerations that will dictate everything else.
Location of the bunks
Where possible, you should locate the bunks under strong sections of the dinghy’s hull. Most sailing dinghies have a strong point under the mast step (given the loads that are transmitted through the mast) and at the back of the centreboard case.
The aft bunk should be located aft of the dinghy’s balance point. The aft bunk should be positioned such that the bow of the boat has positive weight (ie the boat will not accidentally tip off the back of the trolley!), but also minimise the weight at the trolley handle. The best way to identify this point is to carefully place the boat on the ground and place a length of timber parallel to the transom under the boat. Move the boat fore and aft on the timber until the balance point is found. Then move the boat forward until the desired weight at the front of the boat is achieved. The location of the timber under the boat will be the best location for the aft bunk.
If your dinghy is fitted with a self-bailer, you should ensure that the bunks do not interfere with the operation of the self-bailer while the boat is on the trolley. Opening the self-bailer while onshore can be useful to drain water from the cockpit while washing the boat, drying it after use, and during storage to make sure water does not accidentally pool in the bottom of the boat.
Trolley width
The trolley width was an important consideration for me because I needed to be able to get the dinghy through bollards with 1.6 metre spacings that prevent cars from accessing our little beach. The trolley width is also dictated by needing to provide suitable clearance between the hull and the wheels. If the clearance is too small, then the dinghy hull will foul the wheels when trying to launch and recover the boat if the boat is not perfectly aligned on the trolley.
The width restriction of the bollards and use of wide wheels that would roll across sand meant that the bunks on my trolley had to be sufficiently high for the hull to clear the trolley wheels should it not be perfectly aligned when launching and recovering the boat.
Materials
One of the biggest challenges in making a dinghy launching trolley is sourcing all of the materials. I purchased everything I needed from Boat Craft Pacific (epoxy), my local hardware store, local chandlery and eBay. I also needed aluminium rod (purchased from an extruded aluminium supplier, Capral Aluminium) and closed cell foam (purchased from Clark Rubber in Australia).
I recommend that you start by purchasing the wheels and a matching axel. They will be the most difficult to find and match. Build the rest of the trolley to suit them.

These 16″ wheelbarrow wheels with a 1″ bore, purchased from Bunnings, were the start of my launching trolley. They came fitted with roller bearings, but they can be easily popped out and replaced with the supplied nylon bushes which are much better for wheels that are going to be regularly submerged in salty water.
The primary materials used to build the Sabre launching trolley were:
- 70×35 mm MGP10 structural pine (some countries would call this timber two by four or 2×4)
- 18 mm marine plywood (bunks)
- 25 mm dowel (handle)
- Boatcraft epoxy, hardener and filler powder
- double bias fibreglass tape (100 mm wide, 420 gsm, per lineal meter)
- 1 inch aluminium rod (axle)
- 400 mm pneumatic wheelbarrow wheels with 1 inch plastic bush bearings (sourced from Bunnings)
- zip ties and 1 inch plastic washers (to secure the wheels)
- marine paint
- marine carpet and closed cell foam (bunks).
Tools
The primary tools used to build the trolley were:
- measuring tape
- square
- straight edge (for marking up straight lines)
- hand saw (for wood)
- hack saw (for cutting aluminium axle to length)
- 4″ angle grinder fitted with a sanding flap disc (very useful tool!)
- random orbital sander
- power drill and drill bits
- clamps
- sandpaper and sanding block
- brushes and plastic cups for epoxying and painting.
I did not have access to a power saw, such as a mitre saw, for this build. If you are planning to use a hand saw, I highly recommend ensuring that the saw is sharp. Your cuts will be much easier, faster and accurate with a sharp hand saw.
Construction
Construction of the trolley is based around using simple tools, readily available wood, and epoxy and fibreglass. Five primary areas require construction, as described below. I recommend constructing them in the order presented.
The actual building time for this trolley is not long — maybe 10 hours or so. What takes the time is the time for the epoxy to go off and paint to dry. Where possible, apply wet on wet. This means that you rapidly build up the right number of layers/coats without having to wait for the epoxy to go off or paint to dry and subsequent sanding between each coat. Read the instructions for the products you chose to use to see whether wet on wet application is possible.
1. Axle case
I mounted the axle externally on the Minnow trolley using electrical conduit saddles screwed to the wooden frame. These are rapidly rusting! The screw holes are also potential points of entry for water that will promote wood rot.
A better method used on the Sabre trolley is to encase the axle in a laminated box structure and a bed of epoxy filler. This creates a good connection between the axle and trolley that will not rust. While epoxy does not bond well to aluminium, this is not an issue. Even if the bond breaks, the axle will remain in place because it is encased in the timber box and the wheels on either end will prevent it from sliding out of the box. The inside of the timber case has been epoxy sealed so that water can not penetrate the wood, even if water gets in between the axle and epoxy bed.
Cut the axle to the correct length allowing for the wheels and washers and drill the holes for the retaining zip ties before embedding in the axle case. Trial fit the wheels to the completed axle case before proceeding.

Laminating the axle case. The axle case on the left is waiting for the placement of the axle in a bed of epoxy filler before completing. The case on the right is complete.
Room for improvement: On the Sabre trolley I encased the axle with wood on four sides before epoxy gluing the aft bunk and rails to the axle case. On future trolleys, I will only encase the axle on three sides with wood, with the fourth side being formed by the lower section of the aft bunk. This will save material and simplify construction.
2. Rails to axle case
The joint between the rails and the axle case is a simple epoxy glued lap joint. Note that an additional section of wood has been laminated to the outside of the rail. This effectively doubles the surface area of the joint, thereby increasing the strength of the joint.
Laying out the rails in preparation for epoxy gluing to the axle case and toe. Note the additional piece of wood to be laminated to the outside of the rail to increase the strength of the joint with the axle case.
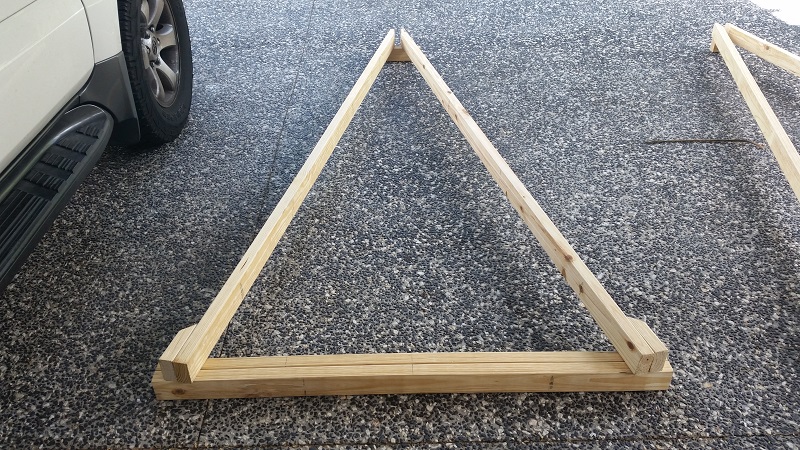
3. Rails to handle T-piece
The force of pulling and pushing the trolley is all transmitted through the junction between the rails and the handle T-piece. Achieving sufficient bracing through this joint is critical.
The joint is made up of three elements epoxy glued together. They should be glued together in the following sequence:
- toe connecting the two rails at the front
- T-piece to the end of the rails and the toe
- side braces connecting the T-piece to the rails.

The toe epoxy glued in place, leaving space to accept the handle T-piece.

Epoxy gluing the handle T-piece to the rails and toe. Note the rope that I used to hold the top of the T-piece in position while the epoxy glue went off. A nail (subsequently removed) at the bottom of the T-piece stopped it from sliding out of the slot between the rails.

Nail at the bottom of the T-piece to prevent it sliding through the slot between the rails while the epoxy glue goes off. The nail is removed once the glue has gone off.

Brace tying the handle T-piece to the rails.
All of the odd angles in this joint can be easily cut using a hand saw and shaped using the angle grinder fitted with a sanding flap disk.
I have found this joint to be sufficiently strong even when pulling and pushing the dinghy over soft sand. If you are concerned about the joint’s strength, the brace can be moved higher.
I regard the toe as being sacrificial — ie, it will wear down over time from being constantly struck on the ground. You may like to protect the toe with a metal plate.
4. Handle
The handle is simple. Drill a hole slightly larger than the chosen size of dowel and simply glue it in place with epoxy (mixed with filler to make a glue paste). I recommend drilling the hole before epoxying the handle T-piece in place.
Make the handle as thick and as short as you can comfortably hold to minimise the risk of breaking the handle. Also choose a dowel size such that sufficient material is left around the hole drilled through the T-piece.
5. Bunks
I initially tried to avoid building bunks for the Minnow trolley, considering them too difficult to construct. In fact, custom moulded fibreglass bunks can be easily built using the following steps:
- Identify the desired location for the bunks (as described in the design considerations section above).
- Cut bottom of the marine plywood bunks to fit the axle case at the rear and the rails at the front, as well as a horizontal brace for the front bunk.
- Rough cut the top of the marine plywood bunks to the approximate shape of the hull.
- Epoxy glue the marine plywood sections in place on the rails as well as the horizontal brace.
- Turn the dinghy upside down and place the trolley on top of the hull.
- Mark the location of the marine plywood bunks on the hull in pencil.
- Using masking tape, secure the marine carpet and closed cell foam padding to the hull in the correct location, then cover with plastic sheet ensuring that a smooth surface is achieved. The epoxy should not stick to the plastic sheet (test if unsure!).
- Laminate layers of fibreglass tape together with epoxy until the desired thickness is achieved, using the hull (covered with marine carpet, foam and plastic) as the mould. I used six layers of 100 mm wide, 450 gsm, double bias fibreglass tape.
- DO NOT REMOVE the fibreglass bunks yet!
- Place the trolley frame over the fibreglass bunks and use a spacing block to mark the shape of the fibreglass bunks on the marine plywood.
- Remove the trolley frame from the dinghy and use a grinder fitted with a sanding flap disk to shape the marine plywood to the correct shape.
- Place the trolley frame over the fibreglass bunks and epoxy glue and fillet to the marine ply bunks, finishing with a couple of layers of fibreglass tape to secure the joint between the marine plywood and fibreglass bunks. I used two layers of 100 mm wide, 450 gsm, double bias fibreglass tape.
- Remove the trolley and sand the fibreglass bunks to shape, ensuring that all sharp edges are also removed.
- Paint the bunks before gluing the closed cell foam padding and marine carpet to the bunks.

Epoxy gluing the rough cut front bunk and horizontal cross brace in place.

Detail of front bunk construction.

The rear marine plywood rough cut bunk epoxy glued to the back of the axle case and rails.

Detail of the joint between the rails, axle case and aft bunk.
Room for improvement: I will not use the horizontal brace for the front bunk on future trolleys. I believe that the marine plywood epoxy glued and filleted to the rails and reinforced with some 100 mm wide, 450 gsm double bias fibreglass tape will be strong enough. This will permit easier and faster construction, while also eliminating the joint between the fibreglass bunk and the horizontal brace. It also reduces materials and eliminates weight at the front of the trolley.
Room for improvement: Make sure the plastic sheet acting as the mould between the hull and the laminated fibreglass bunks is perfectly flat before starting the first layer of fibreglass. In my case, there was a small fold in the plastic which was ultimately replicated in the surface of the bunk. I figured it was going to be covered by a layer of closed cell foam and marine carpet, so it would not matter in the long run. I am planning to try using pallet shrink wrap the next time I build bunks. It should be able to be stretched perfectly across the hull, just like using cling wrap in the kitchen. In Australia, pallet shrink wrap is readily available from Officeworks.
Thanks for a geat article. I was going to buy a trolley for my sabre. This might be a better option.
Do you have any dimensions for a sabre trolley or a picture of the boat on the trolley?
Regards
Geoff
Hi Geoff
I meant to take a photo of the boat on the trolley last weekend, but forgot.
Based on my experience with this build, I would separate the aft bunk and the axel case to provide less weight at the handle as described here. http://www.blokespost.com/sailing/updated-boat-launching-trolley-dolly-design/6313
Rex.
Rex
The local Bunnings has 90×22 mm treated pine decking boards, and 60×19 meranti. Any thoughts on these as lighter alternatives to 70×35 stud material?
Cheers Tony
Hi Geoff,
Thanks for sharing your ideas! I am going to use your design to replace my rusting sabre trolley (welded gal). But one Idea for starters: I filled my Bunnings Wheels, same as yours, with expanding foam. I hated to to repair the tubes on the wheels. and seems to work.
I will let you know about the build process.
Cheers
Michael from Melbourne
I agree with you
37 Off (code-30 off plus prime-10 off) Jewelry Armoire Organizer – Code: Q8RA7AG5 – Deal Price: $53.8 – Expiration Date: 9/16/2020 – https://www.amazon.com/dp/B083K21QKK?tag=youtubevideolarim-20&linkCode=ogi&th=1&psc=1
Great article. Couple of questions.
1. What thickness closed cell foam did you use?
2. What density closed cell foam did you use? Clark Rubber has grey (least dense), blue (moderately dense) and black (most dense).